Appearance
Configure admin settings
The admin settings page allows administrators to configure key parameters for Consult features such as time tracking and leave applications. You can access this page by clicking on your user profile icon (top right corner) and selecting Admin Settings. 
General
Configurations
Configure global system settings that affect how users and managers interact with timesheets and reporting.
Options include:
Daily hours required: Set the number of working hours required per day for employees. Once updated, timesheets that have not been submitted must meet the new hourly requirements before submission will be allowed. Utilization calculations will also be based on the updated value.
Max weekly hours: Define the maximum number of hours a user can log per week. Planned or logged hours cannot exceed the max weekly hours limit. Updating this value will impact resource allocation and scheduling capacity.
Work at risk target: Define the organization's work at risk target. Once updated, it will be displayed on dashboard charts.
Target revenue: Define the organization's target revenue. Once updated, it will be displayed on dashboard charts.
Allow overriding actual hours: Enables project managers to upload or import actual hours directly into timesheets. When enabled, imported actual hours replace manually captured hours for the same period.
DANGER
This should be enabled only when absolutely necessary, since changes to actual hours directly affect utilization, billing, and project reporting.
Timesheet submission: Enables timesheet submission for users. When enabled, users must submit their timesheets for approval by their resource manager. Before activating this option, ensure that each user has a designated resource manager and that the process has been communicated to all users.
Business entities
Manage business entities, which group projects and their related financial data for reporting purposes.
Each business entity includes the following fields:
- Name: The name of the business entity.
- Entity Leads: The users responsible for the business entity.
- Default Entity: Marks the entity as the default for the tenant. New projects are automatically tagged with the default business entity.
To add a new business entity, click New Entity and complete the form.
A business entity can only be deleted if it is not the default and has no projects linked to it.
Approval notifications
Consult provides standard notifications for users based on their roles. However, in some cases certain notifications might be required for specific users to support a company's business processes. To enable this, Consult supports specifying custom recipients for the following notifications:
- Approved expenses (excluding training)
- Approved training
- Approved leaves
Countries
Manage countries
Manage the list of countries where your organization operates. Adding a country enables country-specific regions, public holidays, projects, and users to be created within Consult.
Currencies
Manage the currencies supported by your organization.
Each currency includes the following fields:
- Currency: The currency code (e.g.,
ZAR,AUD). - Ex. rate: The conversion rate relative to the base currency.
- Tax acronym: The short label used to identify the tax applied to this currency (e.g.,
VAT,GST,Sales Tax). This acronym is displayed on invoices, expense reports, and financial summaries. - Tax percentage: The tax rate applied when calculating tax amounts for this currency (e.g.,
15for 15%). This percentage is used to automatically calculate tax on invoices, expenses, and other financial records. - Mileage rate: Optional rate used for mileage calculations.
The currencies added determine which options are available when creating projects and users. They are also used for handling financial records such as user rates, project rate cards, expense reports, and invoices. If a currency is not added, it will not be available in workflows that require financial values.
INFO
The exchange rate defines how much one unit of the base currency is worth in the selected currency. For example, if the base currency is ZAR and the exchange rate for AUD is 0.14, it means 1 ZAR = 0.14 AUD. Conversely, 1 AUD would be equal to approximately 7.14 ZAR.
Country-specific settings
Country-specific configurations are based on the countries that have been added. Select a country from the dropdown to manage its settings.
- Regions: Define geographical regions within a country to enable region-specific public holidays.
- Export or import public holidays: Manage the public holidays for the selected country.
To update public holidays:
- Click Export/Import to download the current public holidays as an Excel file.
- Update the file as needed.
- Upload the updated file back to the app.
- Click Import to save the changes.
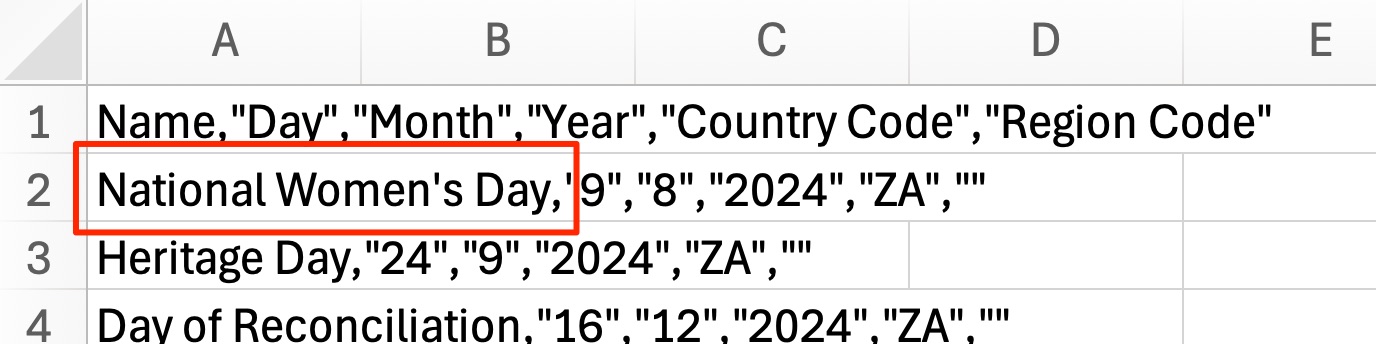
Troubleshooting "There was an error on row 2. The name field is required."
If you get this warning, it might be because you opened the file with Excel, which then automatically formatted the CSV contents. This can be validated by viewing the imported data, which will be missing the double quotation marks (
") around the first words:
In this case, rather open Excel first and then import the CSV data using the Data > Get Data > From Text tool to import the data. This approach should retain the format of the CSV data, but you should still ensure that you save the file as a CSV.
Leave
The Manage Company Leave page enables administrators to configure how each leave type behaves per country, including how balances are calculated, accrued, and reset. You can access this page by navigating to Admin Settings > Leave.
Leave configuration is country-specific — each country is managed independently, with no shared configuration across countries.
Each leave type falls into one of three categories:
General configuration rules
- If a leave type is not configured, available days are not calculated or displayed.
- Although Unpaid Leave and Special Leave are not configurable and both belong to the "Other" category, the number of days taken by employees is still tracked.
Monthly accrual leave
Leave types that belong to the "Monthly accrual" category automatically add the configured accrual amount at the start of each month.
Each country has a default accrual amount of
1.75for annual leave.
Fixed value leave
Fixed value leave types allocate a predefined number of leave days to an employee for a specific period (for example, over a year). The full allocation is granted at the start of the allocation period. Employees can use these days until the balance is exhausted or the allocation period expires.
Fixed value leave calculations for current vs new users
Active users: Balances are calculated by deducting previously approved leave from the total number of available days.
INFO
This calculation considers the validity period that the user is currently in.
For example, suppose the leave balance for sick leave is configured as 25 days over two years. If this configuration has been made three years after a user has been onboarded to Consult, then only the leave taken the past year will be deducted from the amount, since the first two years were part of the first validity period and should be considered irrelevant to the current (second) validity period.
How to configure fixed leave types
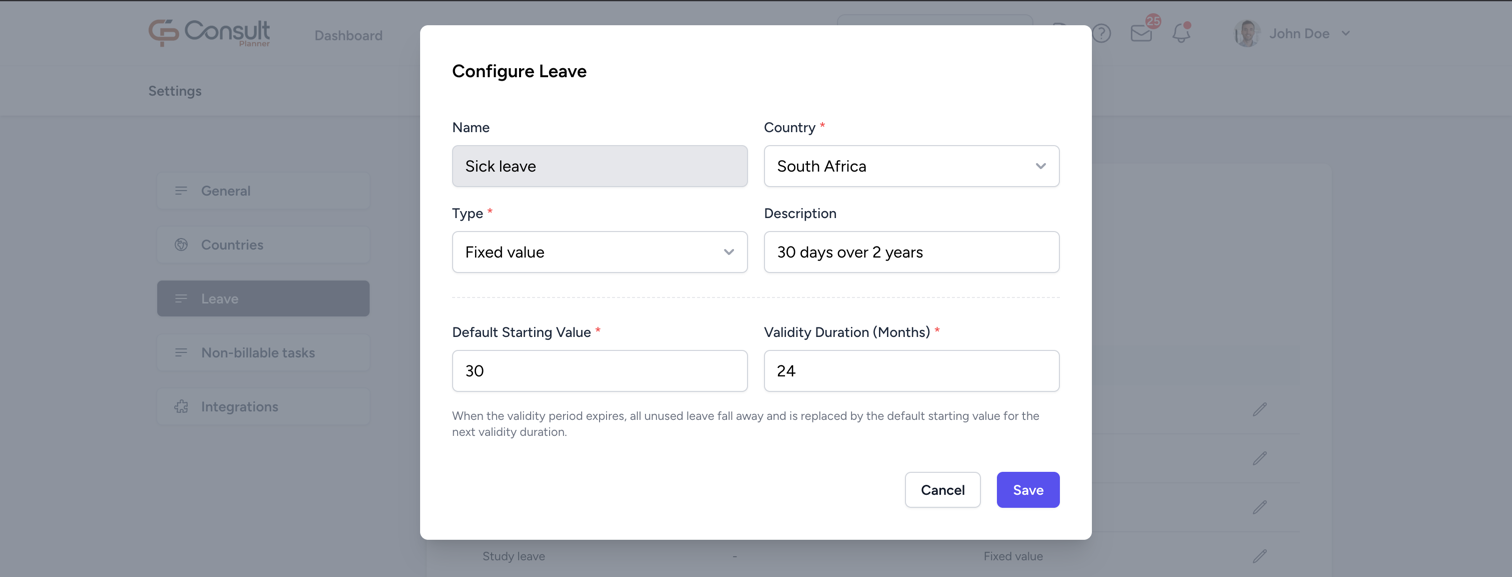
- From the Manage Company Leave page, click on the edit icon next to the leave type you want to configure. The Name, Country and Type fields will be pre-populated.
- Enter the following values:
- Default Starting Value: The number of leave days allocated at the start of each validity period.
- Validity Duration (Months): The number of months the leave days remain valid.
- Description: A brief description of the leave configuration.
- Click Save.
If the fixed leave type has already been configured for the selected country, the Default Starting Value and Validity Duration will be displayed in the Configure Leave view.
Other leave
"Other" leave types do not maintain balances and are not configurable. The leave days are recorded for visibility and reporting only.
This currently applies to Unpaid leave and Special leave.
Non-billable tasks
Create and manage categories for non-billable tasks such as training or internal meetings.
Once created, the category becomes available for all users on their timesheets, allowing them to log hours under that category.
If a category is deleted after hours have already been logged against it, those hours will still appear under an unlinked category. To restore the original category, recreate it using the same name.
Custom fields
Define additional fields to capture project information that is not covered by Consult's standard project fields. Once created, a custom field appears on the overview of every project and is included as a column in the project export (Manage > Projects > Export).
To create a custom field, click New custom field and fill in the following:
Name: The label shown for the field on the project overview. Each name must be unique.
Type: The data type accepted by the field. Choose from
text,date,number,decimal, orcheckbox.The type cannot be changed after the field has been created.
Description: Optional helper text. When set, it is shown as a tooltip next to the field name on the project overview.
TIP
Adding this description can help new project managers understand what information is required when creating a new project or editing this field on a current project.
Required: When enabled, the field must be filled in before a project can be saved.
A field's name, description, or required setting can be changed by clicking the edit icon next to it. However, the field's type cannot be changed after it has been created.
When a custom field is deleted, it is no longer shown on projects, but any values previously captured for it are retained for reference in the database.
Integrations
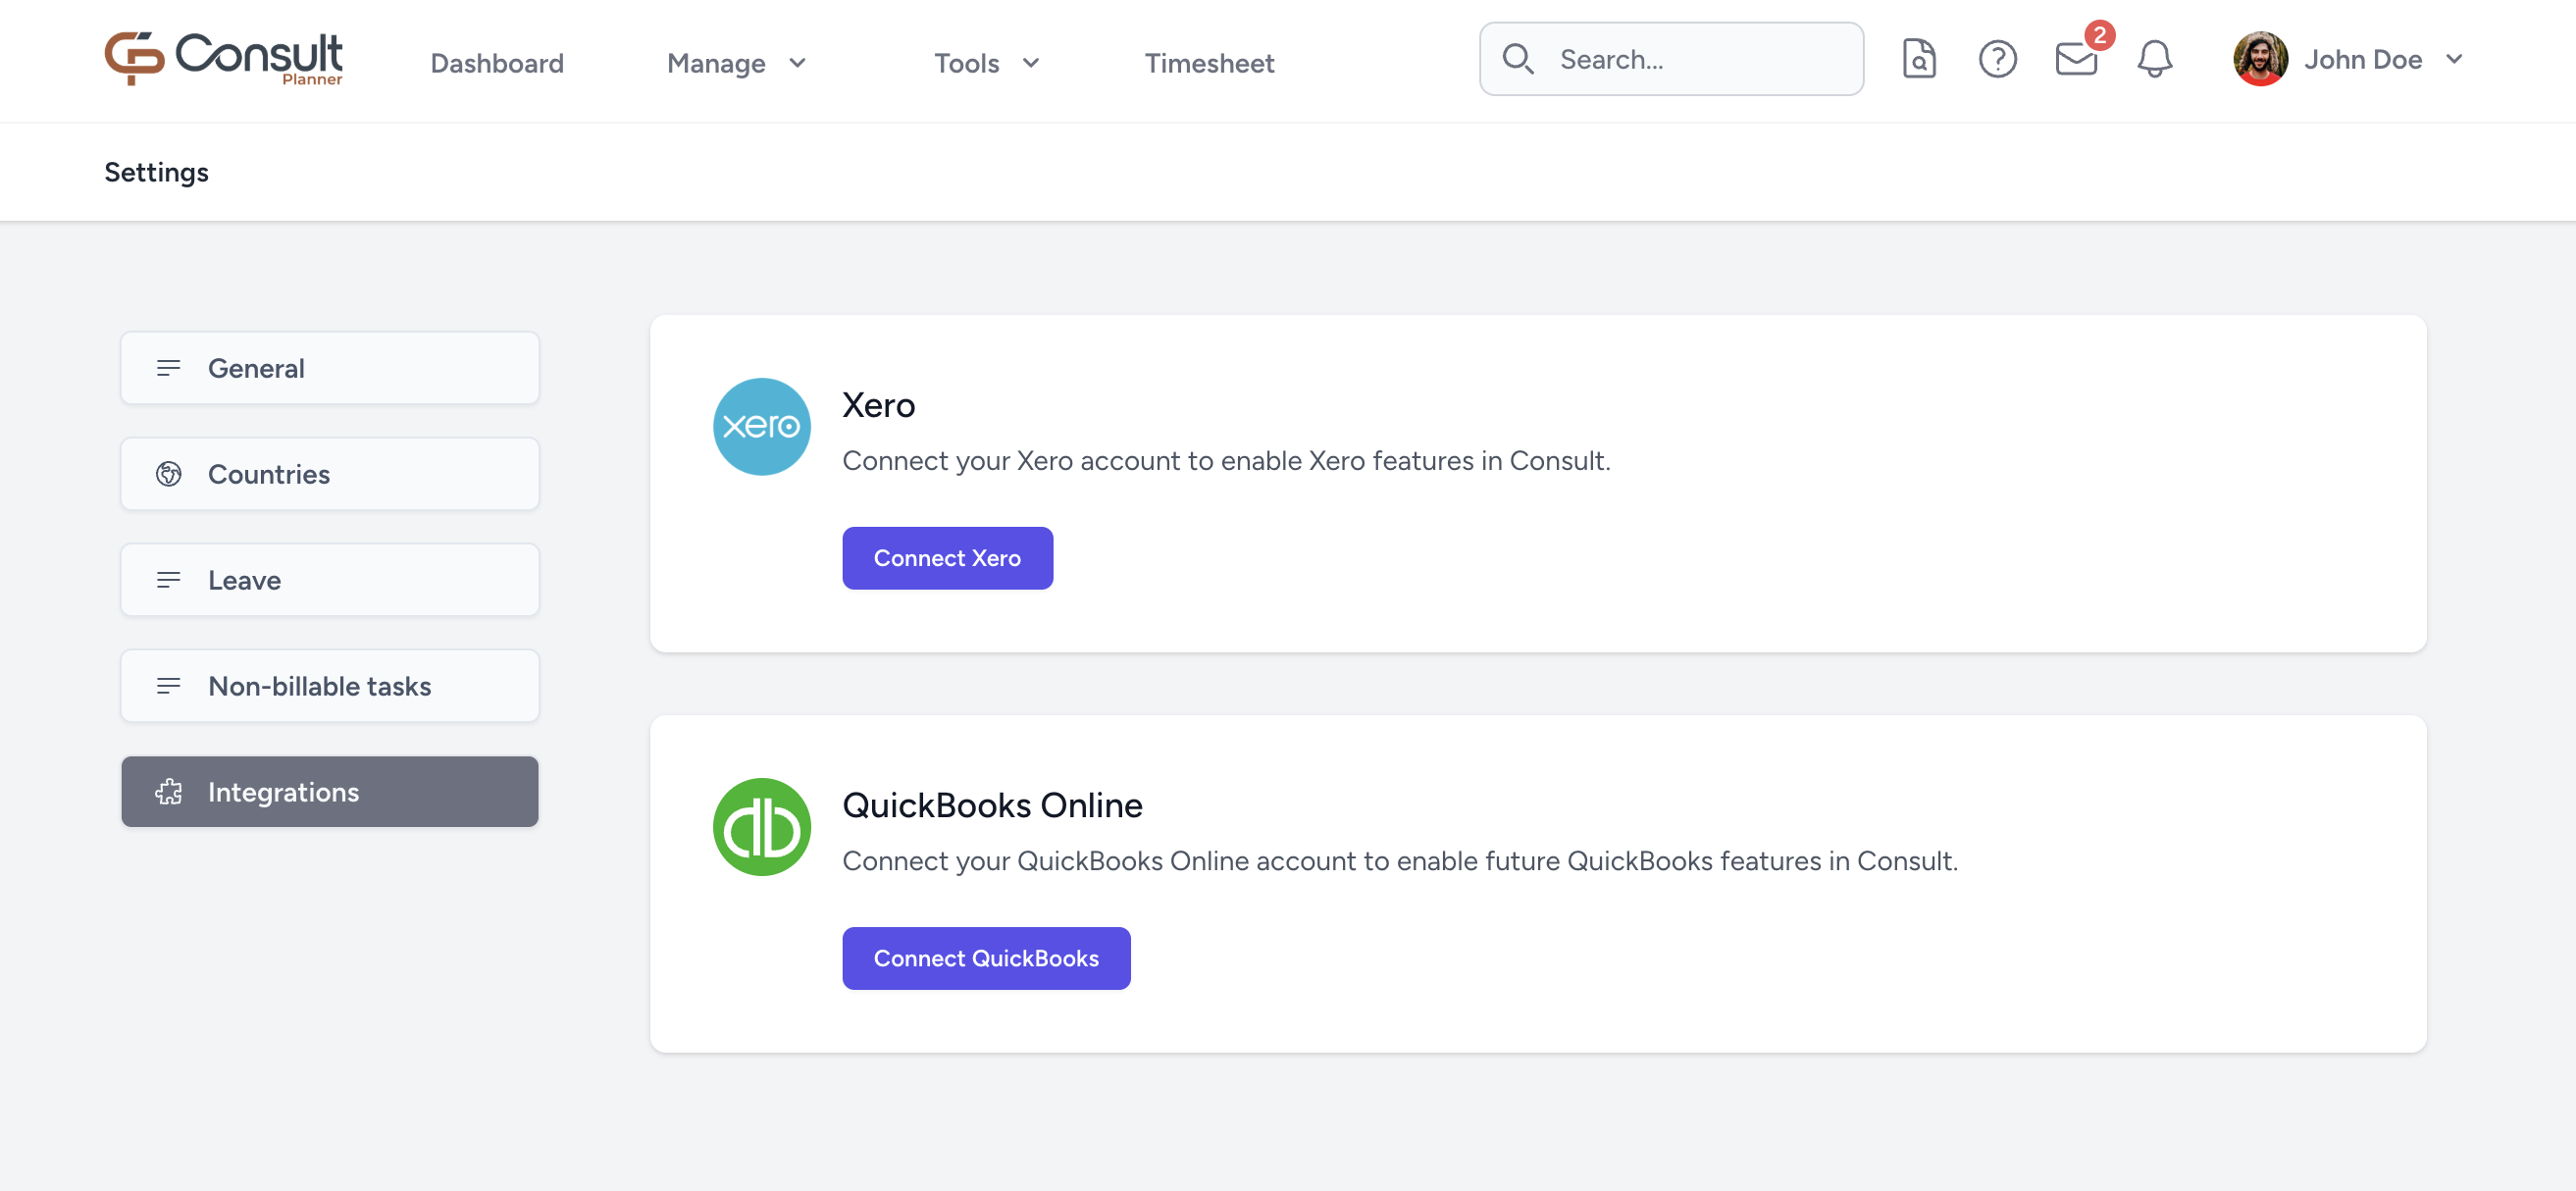
Integrate with external products to improve Consult's usability.
Xero integration
To connect to Xero:
- Click Connect Xero.
- A Xero login page will load. Use your organization's Xero details to complete the login form and click Log in.
- Click Allow access. This will give Xero access to the details of the invoice that is exported from Consult.
The status below Xero should now indicate that it is Connected.
QuickBooks integration
To connect to QuickBooks:
- Click Connect QuickBooks.
- A QuickBooks login page will load. Use your organization's QuickBooks details to complete the login form and click Sign in.
- Select your company. Choose the particular QuickBooks company account you intend to integrate.
- Click Next. This will give QuickBooks access to the details of the invoice that is exported from Consult.
The status below QuickBooks should now indicate that it is Connected.