
Assign work to resources
Assign resources to project designations, appoint a primary project manager, and take resources off a project.
After setting up the project schedule, you can assign resources to the various designations on the project.
Tip: Resources can also be assigned to designations before adding hours on the schedule. This lets you see how many hours can be added for a specific employee, since the schedule view then warns when capacity is exceeded.
Understand the resources view
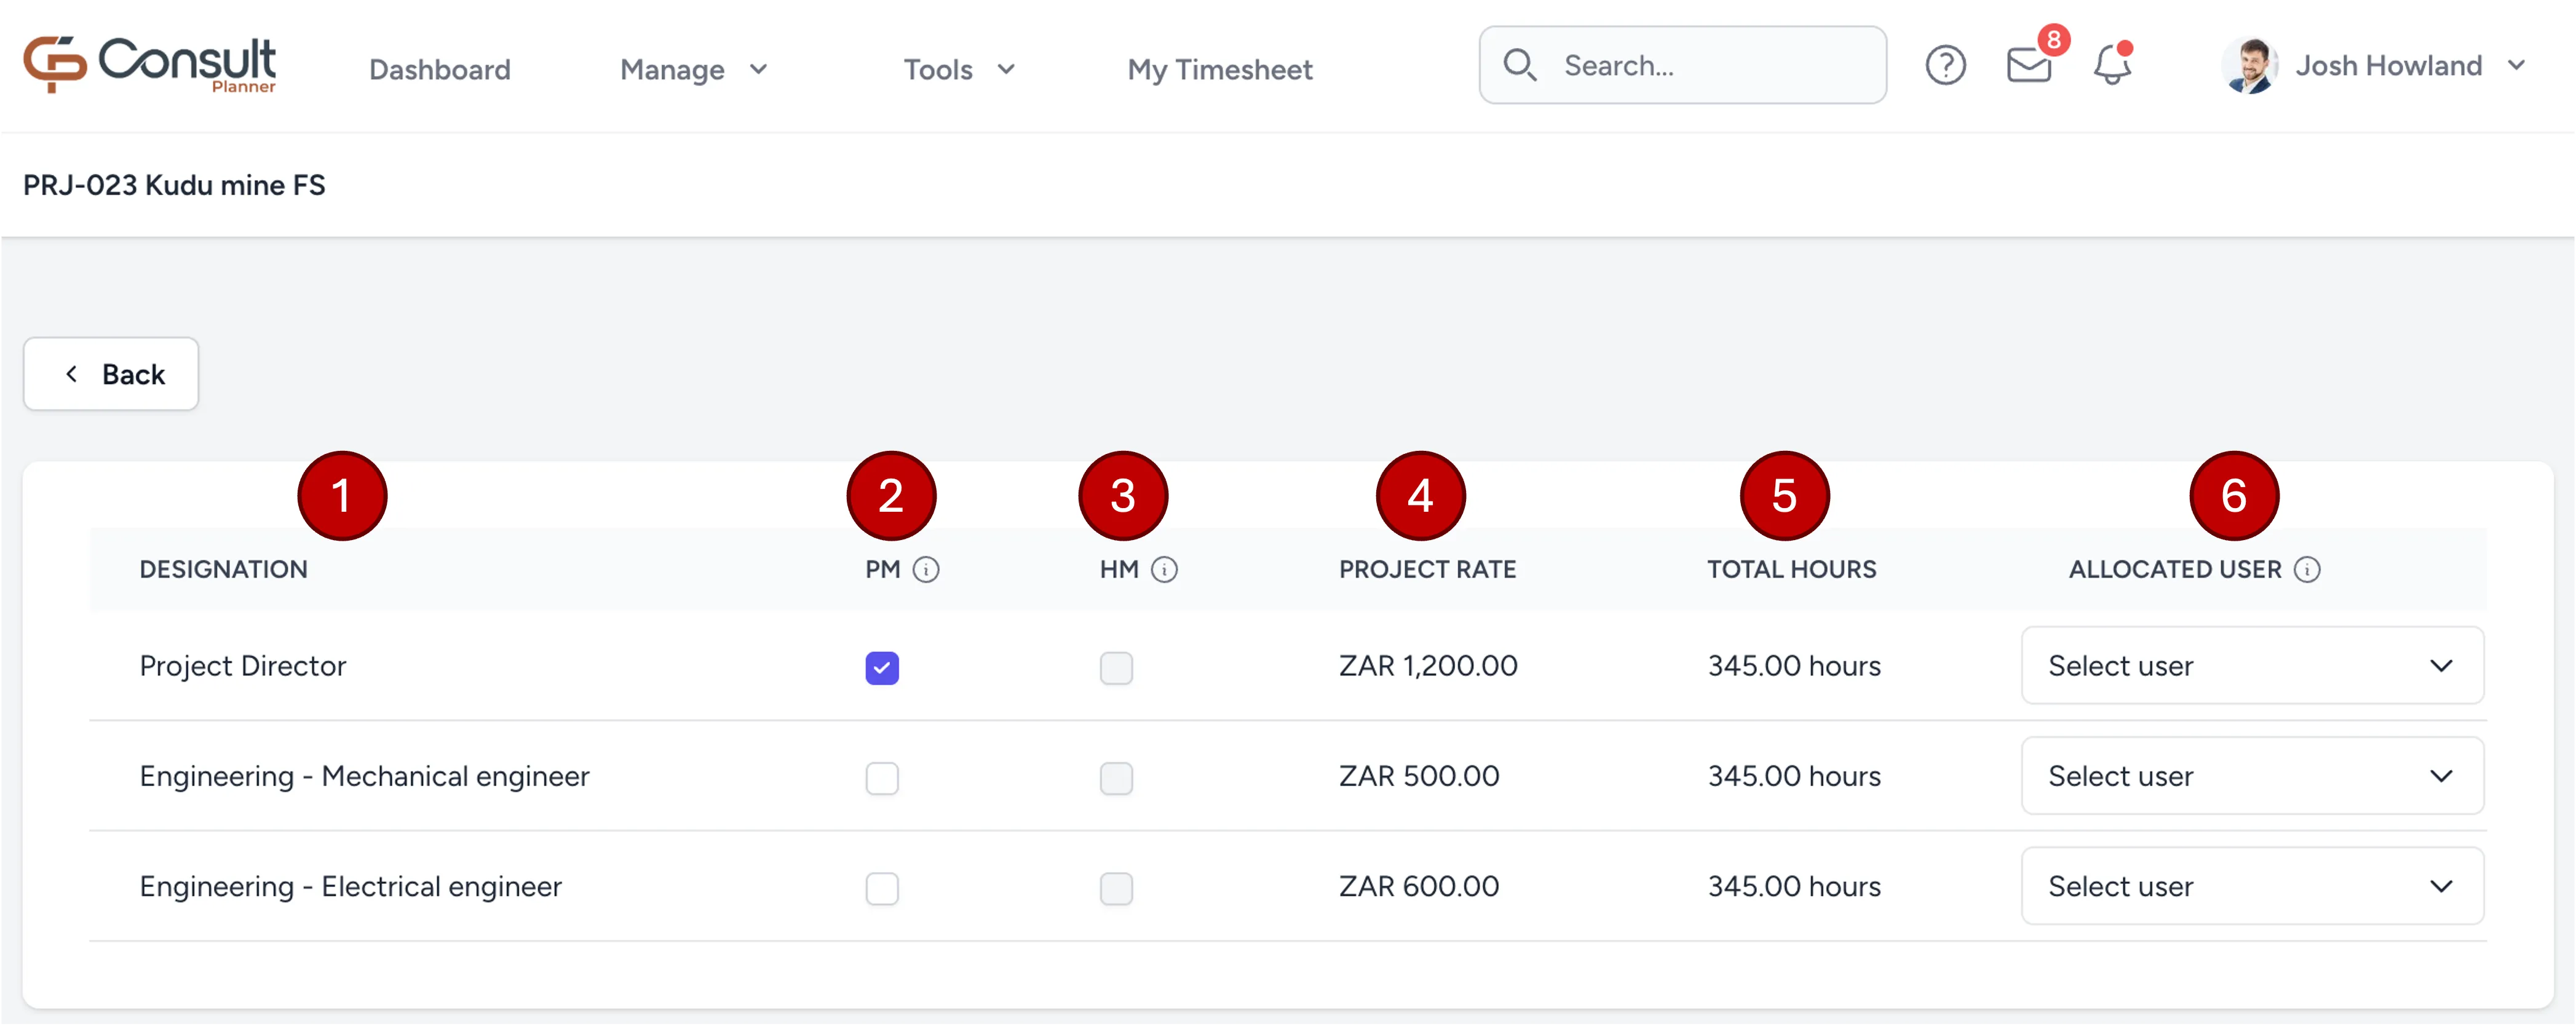
The columns of the resource table, numbered above, are as follows:
- Designation: The name of the designation, as specified in the project organogram during project setup.
- PM: A checkbox that enables a user to act as a project manager on this project.
The column is only shown to the project director and to users with
Manage Projects. Clicking the checkbox opens the Assign Project Manager modal, which offers up to four options:- Project Manager: Reflects the selection of the parent checkbox.
- View Financials: Lets the user view financial information on the project, such as rates, and access potentially sensitive documents uploaded in the Documents tab.
- Primary Project Manager: Names this user as the one project manager who receives the project’s project manager notifications and approval requests. It is only offered for a named person, and stays greyed out until View Financials is ticked. See set a primary project manager.
- Email Notifications: Determines whether the project manager receives project notifications by email. This is useful when, for example, a project director has delegated project management to another user and does not want the email updates, since they already go to the delegated project manager.
- HM: Short for hour management. When enabled, it prevents resources from capturing more hours on a project than have been allocated to them. This is especially helpful when, for example, contractors on a project should work only a fixed number of hours and should consult the project manager before logging more.
- Project Rate: The charge-out rate for this designation on this project, including any discounts configured in the organogram.
- Total Hours: The total number of hours allocated for this designation on this project.
- Allocated user: The user allocated to this designation.
- Actions: The ⋯ menu holding Unallocate and Archive, described under take a resource off a project. It is only shown to users who can update the project.
Assign users to project roles
Consult gives project managers a quick indicator of whether a user is available to fulfil a role.
A green checkmark indicates that the user has the required number of hours for the selected role:
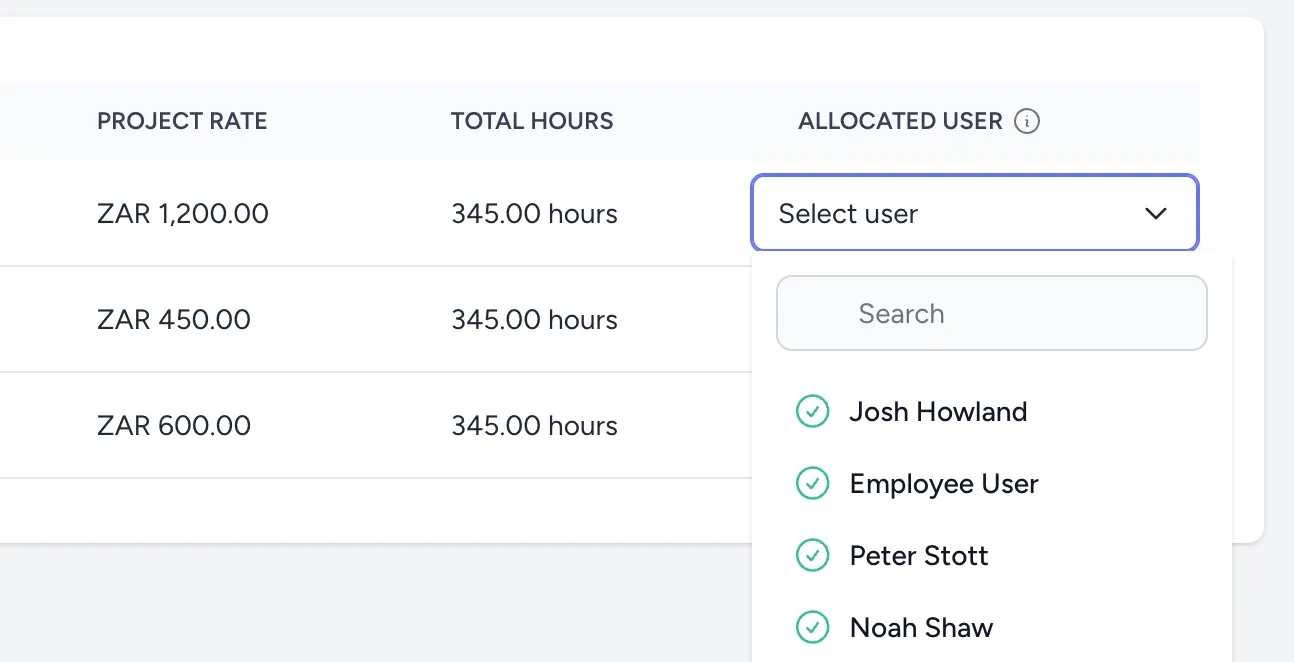
A red cross indicates that the user does not have enough capacity for this project given their current schedule. You can still select that user, which sends a request to their resource manager to approve or reject. If the user has no active resource manager, the request goes to the organisation’s administrators instead.
Tip: Find out who the user’s resource manager is using the company organogram, and notify them of the request with context on why the user is needed. This can speed up approval. The resource manager can move the user’s hours around to free up capacity for the project.
Open slots
A designation with nobody allocated to it is an open slot once it has forecast hours in at least one week of the project. A designation with no user and no forecast hours anywhere on the project is not counted, so roles that are not yet planned do not inflate the figures.
Open slots are counted in the badge on the project’s Resources tab, on the Tools > Open Slots page and its badges, and in the open slot and revenue at risk figures in Analytics. The whole project is checked, so a slot still counts when its forecast hours fall outside the period being viewed, and adding hours to a designation makes it an open slot straight away.
Set a primary project manager
A project can name one primary project manager, who owns the project’s approvals and alerts. Everyone else ticked as a project manager keeps the same access to the project; what changes is who is asked to act.
Whether to appoint one
Leaving the role empty is safe, and nothing is lost. Without a primary, every person ticked as a project manager keeps receiving the project manager notifications and approval requests, which is how Consult worked before the role was introduced.
Appointing a primary is only worth it on projects with more than one project manager, where one named person should own approvals and alerts. On a project with a single project manager, appointing them changes nothing.
Tip: There is no need to go through existing projects and appoint a primary on each one. Appoint one only where a project has several project managers and a single owner is wanted.
Appoint a primary project manager
Only the project director, or a user with Manage Projects, can set the primary.
Everyone else does not see the PM column at all.
To appoint one:
- From the project overview page, open the Resources tab.
- In the PM column, click the checkbox on the person’s row to open the Assign Project Manager modal.
- Tick Project Manager, if it is not already ticked. The Primary Project Manager option only appears once it is.
- Tick View Financials. Primary Project Manager stays greyed out until it is.
- Tick Primary Project Manager.
- Click Save.
Consult confirms with “Primary project manager assigned.”, and the row is marked with a Primary badge. A project can only have one primary, so appointing someone else replaces the current one. Any project manager approvals already waiting move to the new primary’s inbox straight away, without a fresh email.
To remove the role, open the modal again, untick Primary Project Manager, and click Save. Consult confirms with “Primary project manager cleared.”.
Who can be appointed
The person must meet all of the following:
- They must have View Financials ticked on their own row on this project.
This is the most common blocker.
Seeing financials some other way, such as through their application role, as the project director, or through
Manage Projects, does not count, because the check reads the tick on the project row. The rule exists because expense report notifications only go to project managers with View Financials, so a primary without it could not own them. - They must be ticked as Project Manager on this project.
- The row must be a named person. An open slot cannot be appointed, including the Project Director row a new project starts with, until someone is allocated to it.
- They must be an active user. Deactivated and deleted users cannot be appointed.
What a primary changes
Once a project has an active primary, the following go only to that person, and not to every project manager:
| Goes only to the primary | Detail |
|---|---|
| Timesheet hours approval | The Timesheet Awaiting PM Approval email and the approval in the inbox, where project manager timesheet approval is switched on. |
| Weekly and daily summaries | The Project timesheet summary, the Utilization summary report, and Resource over utilized. |
| Project notifications | Leave approved for someone on the project, allocation requests, schedule updated or rejected, resource allocated or deallocated, and rollover failed. |
| The project manager on the projects | The Project Manager column on the projects list and in the Export Projects file, and the Primary Project Manager filter on the projects list. |
Where one of these notifications also goes to someone other than the project managers, such as the resource or their resource managers, they still receive it. An allocation request, for example, still goes to the resource’s own managers, who remain the people who approve it.
The other project managers no longer see the approval in their inbox or receive its email, so in practice only the primary actions it. They keep every other kind of access to the project.
Warning: The primary’s own Email Notifications tick still applies. If it is off on the primary’s row, the project notifications above are not sent to anyone, since the other project managers are not used as a fallback. Approval requests still reach the primary.
These are not affected, whether or not a primary is set:
- Expense report submitted: Goes to every project manager on the project who has View Financials and Email Notifications ticked.
- Project status changed and Project duration changed: Go to everyone on the project with email notifications on.
- Project created and Project sold: Go to the application administrators.
- Timesheet, leave, and other line-manager approvals: Go to the person’s resource managers.
Without a primary, the Project Manager column on the projects list shows the first project manager who is not the project director, or the director when they are the only one, and the Primary Project Manager filter does not match the project.
When the primary changes without anyone appointing
The primary is cleared automatically when they stop qualifying: Project Manager or View Financials is unticked on their row, they are unallocated or replaced on it, or the resource is deleted. This does not happen when they still hold another project manager row with View Financials on the project, and archiving the resource does not clear it.
A primary who is deactivated is ignored, so the project behaves as though it has no primary and every project manager receives the notifications and approvals again. They resume as primary if they are reactivated, and the Primary badge stays on their row in the meantime.
Take a resource off a project (archive or unallocate)
When someone comes off a project, the resources table offers two actions from the ⋯ menu at the end of their row:
- Archive: Marks the resource as inactive on the project and keeps everything already captured against them. Use this when the work is finished or has moved to someone else, but the history still matters for reporting and invoicing.
- Unallocate: Removes the person from the designation but keeps the designation itself, along with its forecast hours, on the project. Use this when the role is still needed and someone else will fill it.
Archiving is reversible, and it does not affect the person’s own access to Consult or to the project. Removing a resource from the project organogram, by contrast, deletes the resource and discards its hours, so archive it instead whenever the history should be kept.
Tip: Archive rather than delete whenever a resource has already worked, been forecast, or been invoiced on the project. Deleting cannot be undone.
Anyone who can update the project can archive a resource on it.
To archive a resource:
- From the project overview page, open the Resources tab.
- Click the ⋯ menu at the end of the resource’s row.
- Click Archive.
- Confirm the action in the Archive Resource dialog, which asks “Are you sure you want to archive the selected project resource?”.
The row is greyed out and marked with an Archived badge, which shows the date it was archived when hovered over. To reverse it, follow the same steps and click Unarchive.
Archiving keeps the resource’s forecast hours, actual hours, invoiced hours, rate, and approval history exactly as they were. What changes is that the resource can no longer be forecast or captured against:
- The resource stays visible on the schedule, greyed out, and its cells can no longer be edited.
- The resource stays visible on the timesheet, greyed out, and capturing hours against it is refused with “This project resource has been archived.”.
- The resource is left out of schedule generation, baselines, hours rollover, schedule imports, and Gantt editing.
- The resource still appears on an invoice if it contributed hours, but no new empty lines are created for it.
Note: Archiving stops new planning from here on, it does not remove hours that were already forecast. A project’s forecast and utilisation figures continue to include an archived resource’s existing hours.