
Create an invoice
Create a project invoice, review its details, prepare and export it to Xero, QuickBooks, or Sage, and follow its payments and credit notes in Xero.
This guide explains how to create an invoice for a project. For the stages an invoice moves through, see the invoice life cycle.
The invoices for a project are listed like this:
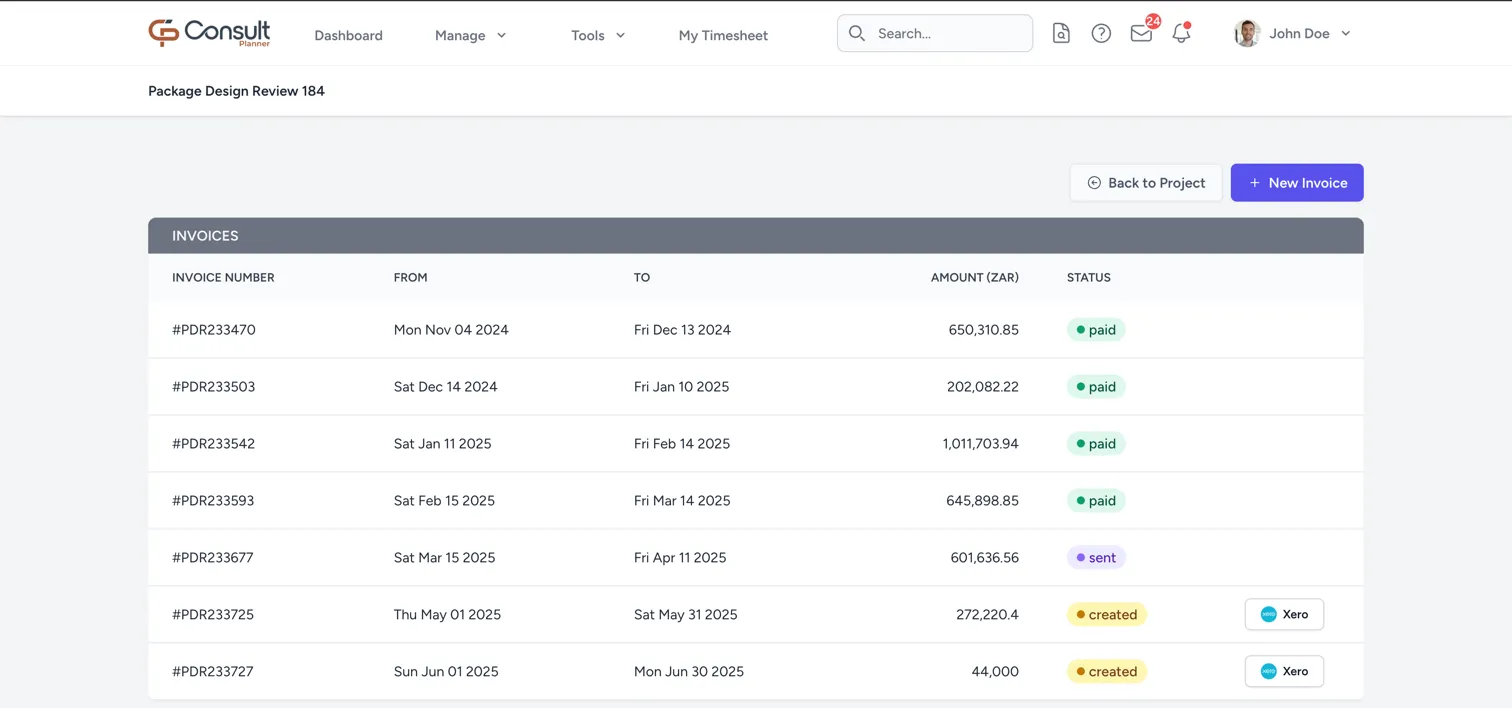
The list is ordered by the start of each invoice’s period, earliest first, so the periods read in sequence.
Create a new invoice
To create an invoice:
-
Go to the project by selecting Manage > Projects and choosing the project.
-
In the left sidebar, click Invoices.
-
Click + New Invoice.
-
Specify the From and To dates, then click Save.
The period cannot overlap another invoice on the project, unless it covers exactly the same dates as that invoice and some of the hours in it are still unbilled. See bill a period across more than one invoice.
If the project’s invoices are exported to Xero, the modal also has a Xero Settings block. It is pre-filled from the project’s Xero billing defaults, or from the project’s latest invoice, and every field in it is optional:
- Organisation, Branding Theme, Tracking Category, and Tracking Option: Where the invoice goes in Xero and how it is presented and tracked there. Changing the organisation clears the other choices.
- Xero Contact: The Xero contact to bill. Type part of a name and click Search, or search with the box empty to list every active contact, then pick one from Select Xero contact. Consult suggests the contact last used for this client, or a contact whose name matches the client’s exactly.
- New Xero Contact Name: Enter a name and click Create to add a new contact in Xero, where none exists yet. The new contact is remembered for this client.
-
Review the invoice details.
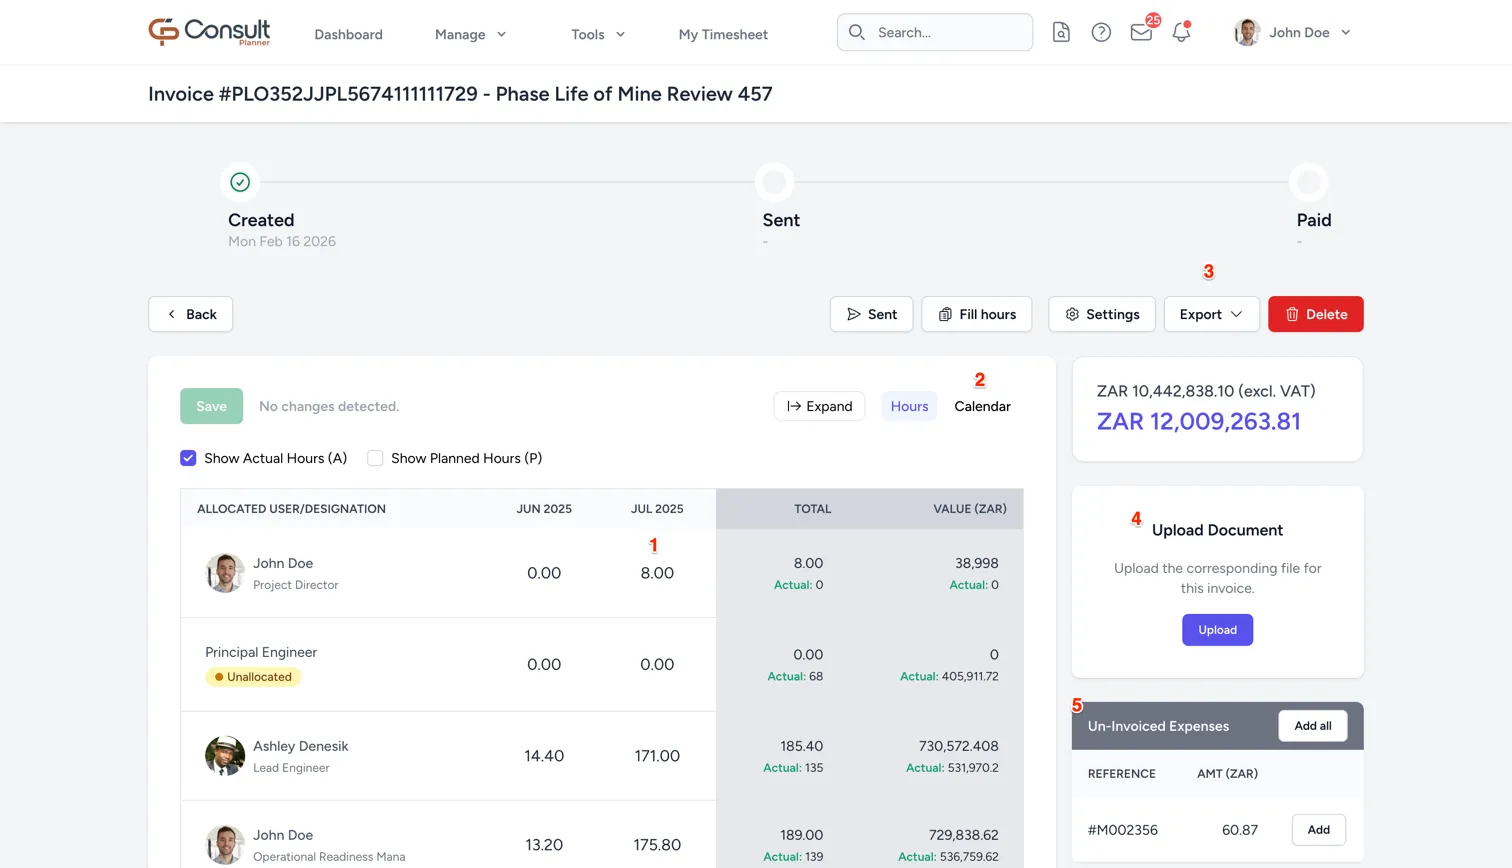
On this page you can do the following:
-
Change the billed and invoiced hours.
Tip: For the differences between the hour types, see hour types. Use the Fill Hours function to align all invoiced hours to a resource’s actual hours.
-
Show the hours not yet invoiced. Tick Show Uninvoiced Hours to show, beneath each resource’s name, how many of its actual hours on the project have not been invoiced, so older unbilled work is not missed. A resource with nothing left to invoice shows no figure.
-
Change the time period for the invoice. Use the calendar view to see the start and end date for the invoice.
-
Export hours. Once the hours are saved, export them to Excel to use in your own invoice template.
-
Upload the invoice document. After exporting the spreadsheet and creating the invoice, import the invoice artifact to keep it for reference later in the project. Documents can be up to 20 MB.
-
Add expenses to the invoice by clicking Add. The expenses linked to the invoice appear beneath the hours in a section labelled Added Expenses. Only expense reports from this project can be added. To take one off again, click Remove on its row, which recalculates the total straight away; this is only possible until the invoice is marked as sent.
Note: For more on how expenses are pulled into invoices, see invoice calculation.
-
-
Once the details are confirmed, click Export in the top-right corner. Select Timesheet Report to download the data for your own invoice template, or Expense Reports Summary to export all expenses included in the invoice.
-
After sending the invoice to the client, click Sent to update the invoice status in Consult.
-
When the invoice is paid, click Mark as Paid.
If changes are needed, click Retract to edit the invoice. Use Settings to change the invoice’s period and Xero settings.
Note: For an invoice exported to Xero, Consult marks it as sent and paid by itself as it changes in Xero, so steps 7 and 8 are not needed. See track payments from Xero.
Once an invoice has been exported to Xero, QuickBooks, or Sage, it can no longer be edited by anyone, and the Settings and Sent buttons are hidden.
Mark as Paid is shown once an invoice has been sent or exported, until it is paid, to anyone who can edit the project or manage all project invoices. It is offered on exported invoices too, for example to close off an invoice exported to QuickBooks or Sage, where Consult does not follow payments.
Bill a period across more than one invoice
Invoice periods on a project cannot overlap, with one exception: a new invoice can cover exactly the same From and To dates as an existing invoice, as long as some of the actual hours in that period have not been billed yet. This lets you bill hours captured late, after the first invoice for the period was raised.
The new invoice is pre-filled with only the hours that remain, which are the actual hours for each week less the hours already billed on the other invoices for the period. Its invoiced hours cannot be raised above what remains, and saving more shows “Invoice hours cannot exceed the hours remaining after other invoices.”.
A period that overlaps an existing invoice without matching its dates exactly, or one with no unbilled hours left, is still refused with “One or more invoices already exists between the selected dates.”.
Which resources appear on an invoice
The invoice lists the project’s current resources, plus any resource that is no longer current but still carries hours on this invoice.
A resource that has been archived, removed from the project, or unallocated only earns a row when the invoice bills hours against it. Where it does, the row is kept and badged Archived, Removed, or Unallocated so the history stays visible on the invoice that billed it. Where it does not, the row is left out rather than rendered empty, which keeps the resources that do carry hours at the top of the list.
The test is the hours frozen onto this invoice, not the hours currently on the schedule. The two can legitimately differ, and using the frozen figure means a row carrying real billed value is never hidden.
Prepare and export an invoice to Xero
Preparing an invoice for Xero and exporting it are separate steps. Anyone who can edit the invoice can prepare it and save the preparation, but only a role with the Export-invoices-to-accounting right can send it to Xero. A project manager can therefore get the Xero invoice ready for a finance user to check and export.
To prepare and export an invoice:
-
From the invoice view, go to Export > Export to Xero. Without the Export-invoices-to-accounting right, the option reads Prepare Xero Invoice instead.
Note: If neither option is available, either Xero is not connected, so ask an administrator to connect it, or the invoice has already been exported.
-
In the Prepare Invoice for Xero modal, review the details used to create the invoice in Xero. They are pre-filled from the invoice’s Xero settings, and any changes can be made on the modal itself or in the project’s Xero Billing section:
- Xero Organisation: Which organisation to create the invoice in, chosen here when more than one is connected.
- Branding Theme, Tracking Category, and Tracking Option.
- Xero Contact: The contact to bill, chosen the same way as on the invoice. To add one, enter a New Xero Contact Name and click Create new Xero contact.
- Issue Date, Due Date, and Reference. The reference defaults to the purchase order number followed by the invoice number.
- Invoice Number: Optional; leave it blank for Xero to create one.
The Currency and Contact Name are shown for reference and cannot be changed here.
-
Choose how the invoice lines are built:
- Leave Use Custom Line Items unticked to send the invoice’s own lines, which are listed with the Client Invoice Total they come to. Choose the Xero Account each line is posted to, or leave it as Automatic revenue account to use the default revenue account.
- Tick Use Custom Line Items to write the lines the client sees yourself, as described in use custom line items.
-
Click Save Invoice to keep the preparation without exporting it.
-
Click Review to save the preparation and preview the invoice as it will be created in Xero. The preview shows the organisation, the Billed To contact, the Issue Date, Due Date, Reference, and Currency, then the lines, the Subtotal, the tax, and the Total Due.
-
Click Export to send the invoice to Xero, or Back to return to the modal and make changes. Export is only shown to a role with the Export-invoices-to-accounting right.
A saved preparation is offered to the next person who opens the modal, so a finance user picks up where the project manager left off. The contact, issue date, due date, and reference can be left blank while preparing, but are required to export, as is the organisation when more than one is connected. Review is unavailable until the invoice has at least one line to send.
Closing the modal with unsaved changes asks for confirmation first. The saved preparation is kept, and only the unsaved changes are lost.
Once the invoice is created, a button is added to the invoice page that opens it directly in Xero:

Note: On the exported invoice, the Item and Project columns may appear blank if the corresponding items do not exist in the Xero account. To display these fields on exported invoices, add the items to the Xero account using matching item codes.

Standard invoice lines
Without custom line items, the invoice is sent with a line for each resource, expense report, and line item on it.
Xero recalculates each line as quantity multiplied by unit amount, so a resource whose rate changed inside the invoice period cannot be sent as a single line. Consult sends one line per rate the invoice froze instead, each carrying the hours booked at that rate. A resource billed at one rate for the whole period is therefore one line, and a resource whose rate stepped mid-period is two or more.
Each resource line is described by the name of the person assigned, falling back to the resource’s name or its role where no one is assigned.
A line with no value, such as a resource with no hours on the invoice, is sent as a description only, without a quantity, price, item code, account, or tracking.
Use custom line items
Custom line items let you bill the client in your own words and amounts, for example as a single fixed-fee line, while the hours and values behind the invoice stay unchanged in Consult. Each line is linked to the resources it covers, so Consult can compare what the client is billed with the value of the hours captured.
To add a custom line:
- In the Prepare Invoice for Xero modal, tick Use Custom Line Items. The Client Invoice Lines section replaces the standard lines.
- Click Add Invoice Line.
- In the Add Invoice Line modal, enter the Description the client sees on the invoice.
- Choose the Xero Account, or leave it as Automatic revenue account.
- Under Linked Consult Resources, tick the resources the line covers. The Calculated Resource Value shows what their hours on this invoice come to.
- Enter the Client Invoice Amount, excluding tax. Beneath it, Consult shows how far the amount is over or under the calculated value, or that it matches.
- Click Add Line.
Every line needs a description, at least one resource, and an amount. A resource can only be linked to one line, so a resource already linked to another line cannot be ticked.
Lines are saved as soon as they are added, edited, or removed. Each line in the table shows how many Resources it links, its Resource Value, its Client Invoice Amount, and its Xero Account. Expand a line to see its resources and its Line variance, which is the client invoice amount less the calculated resource value. Click Edit Linked Resources to change a line, or Remove to delete it.
Beneath the lines, Consult shows whether every resource on the invoice has been linked, and compares the Underlying CONSULT Value of all the hours on the invoice with the Prepared Client Invoice Total, both excluding tax. A resource left unlinked does not stop the export.
Each custom line is sent to Xero with a quantity of 1, the amount entered, the chosen account, the project’s tax rate, and the invoice’s tracking, but no item code. Only the custom lines are sent, so expense reports and line items on the invoice are not sent separately; include them in a line’s amount if the client is to be billed for them.
To go back to the standard lines, untick Use Custom Line Items. Where lines have been added, the Discard Prepared Lines dialog asks you to confirm, since the saved lines are cleared; click Discard Lines to continue, or Cancel to keep them.
The exported invoice in Consult
Once the invoice is in Xero, an Exported Invoice table beneath the hours lists the lines as they were sent, with each line’s Description, Account, and Amount, followed by the Subtotal, the tax, and the Total. Click Preview Invoice to see the invoice laid out as it was recorded at export.
Track payments from Xero
Once an invoice is in Xero, Consult follows what happens to it there and updates the invoice by itself:
- Approving the invoice in Xero marks it as Sent in Consult. An exported invoice starts as a draft in Xero, so it only shows as sent once it has been approved there, unless it was marked as sent before it was exported.
- A part payment moves it to Partially paid.
- Settling it in full in Xero marks it as Paid.
The timeline at the top of the invoice shows these stages as Created, Sent, Partially paid, and Paid, and the status column on the invoices list shows the same.
The Xero Invoice card
An exported invoice shows a Xero Invoice card in place of the usual totals card:
- The invoice total including tax, with the total excluding tax beneath it.
- A bar showing how much of the invoice has been settled by payments and credit notes together, captioned with the amount settled or with Settled in full.
- Invoiced, Payments Received, Credit Notes, and Outstanding, which is the amount Xero says is still due.
- Under Internal to Consult, the Variance vs Hours Captured, which is the Xero subtotal excluding tax less the Consult value of the hours billed on the invoice.
The variance is shown with its percentage, or as None when the two match. Expense reports and line items are part of the Xero subtotal but not of the hours value, so they add to the variance, as does any difference between custom line amounts and the hours they cover.
Only payments count towards Partially paid and Payments Received. An invoice reduced only by credit notes does not show as partially paid, and one that is fully credited shows as Paid.
Note: Updates arrive from Xero as they happen, but an open page does not refresh itself. Reload the invoice page to see the latest status.
If the invoice is deleted or voided in Xero
An invoice that is deleted or voided in Xero returns to Created in Consult and is marked Removed in Xero, both on the invoice and in the invoices list. The link to Xero is removed, so Export to Xero is offered again and the invoice can be edited and exported afresh.
Create a credit note in Xero
A credit note can be raised against an invoice in Xero without leaving Consult. The Create Credit Note button is shown on the invoice page when the invoice is in Xero, its Xero organisation is still connected, and your role includes Export-invoices-to-accounting.
To create a credit note:
- On the invoice page, click Create Credit Note. The Create Credit Note modal loads the invoice’s current lines from Xero.
- Set the Credit Note Date, which defaults to today.
- Enter a Reference / Reason, which is required.
- Under Select invoice lines, select the line to credit. A credit note covers one line, so raise another for each further line.
- Enter the Credit quantity, up to the Remaining creditable quantity shown beneath it. The Estimated line credit shows what the credit comes to.
- Click Create & Allocate.
Consult creates the credit note in Xero, allocates it against the invoice, and confirms with “Credit Note created and allocated.”.
A credit note can only be raised while the invoice is approved in Xero and still has an amount due, and it cannot credit more than is outstanding. A line that cannot be credited shows the reason beneath it, for example because it has already been fully credited or is not a quantity-priced line.
Warning: If Consult reports that the credit note was created in Xero but could not be allocated to the invoice, do not create another one. Contact support with the credit note reference shown in the message.
Credit notes raised directly in Xero and allocated to the invoice are picked up automatically. Once an invoice has one of those, Consult no longer lets you credit quantities against it, since it cannot tell which lines that credit covered.
Credit notes on the invoice
The invoice’s credit notes are listed in a Credit Notes table showing each note’s number, Date, Status in Xero, Xero Organisation, Total, Allocated, and Remaining. A credit note that has been voided or deleted in Xero is left out of the table, and no longer counts towards the credited amount.
The Credit Notes row of the Xero Invoice card shows the total credited. Credits are taken off the total including VAT. The amount on the invoices list is unchanged by credit notes.
Export an invoice to QuickBooks
To export an invoice to QuickBooks:
-
From the invoice view, go to Export > Export to QuickBooks.
Note: If this option is not available, either QuickBooks is not connected, so ask an administrator to connect it, or your role does not include the Export-invoices-to-accounting right.
-
In the Export to QuickBooks modal, review the information used to create the invoice in QuickBooks. Any changes can be made on the modal itself or in the project settings.
-
Click Send to QuickBooks.
Once the invoice is created, a button is added to the invoice page that opens it directly in QuickBooks:

Export an invoice to Sage
To export an invoice to Sage:
-
From the invoice view, go to Export > Export to Sage.
Note: This option is only offered once an administrator has connected Sage and selected a Sage company, and your role includes the Export-invoices-to-accounting right.
-
In the Export to Sage modal, review the Contact, Issue Date, Due Date, Invoice Number, Reference, and Currency used to create the invoice in Sage. The Invoice Number is optional; leave it blank for Sage to create one.
-
Click Send to Sage.
Once the invoice is created, a button is added to the invoice page that opens it in Sage.
How exported lines are priced
Both exports price their hour lines from the rates the invoice froze when it was prepared, which is what Consult itself bills. An export therefore reconciles against the invoice total held in Consult, and neither export is restated by a later change to a project rate.
This applies to the standard lines. An invoice sent to Xero with custom line items carries the amounts entered on those lines instead, so it can differ from the Consult total by design; the variance on the Xero Invoice card shows by how much.
An exported total can still differ by a few cents, because Consult totals the invoice unrounded while each export rounds every line to two decimals. A gap of that size is the rounding, not a pricing error.
Note: Sage exports share the Xero line format, so the same pricing applies.