
Allocate hours on project schedule
Allocate hours to the roles on your project.
The Schedule interface lets project managers plan, fill, and import weekly hours for project resources. From the project overview page, open it by selecting Schedule in the side navigation.
Edit weekly hours directly
To edit weekly hours directly:
- Click the month to see the weekly schedule.
- Click the cell for the resource and week you want to edit.
- Enter the forecast hours.
- Click Apply for changes to commit the changes.
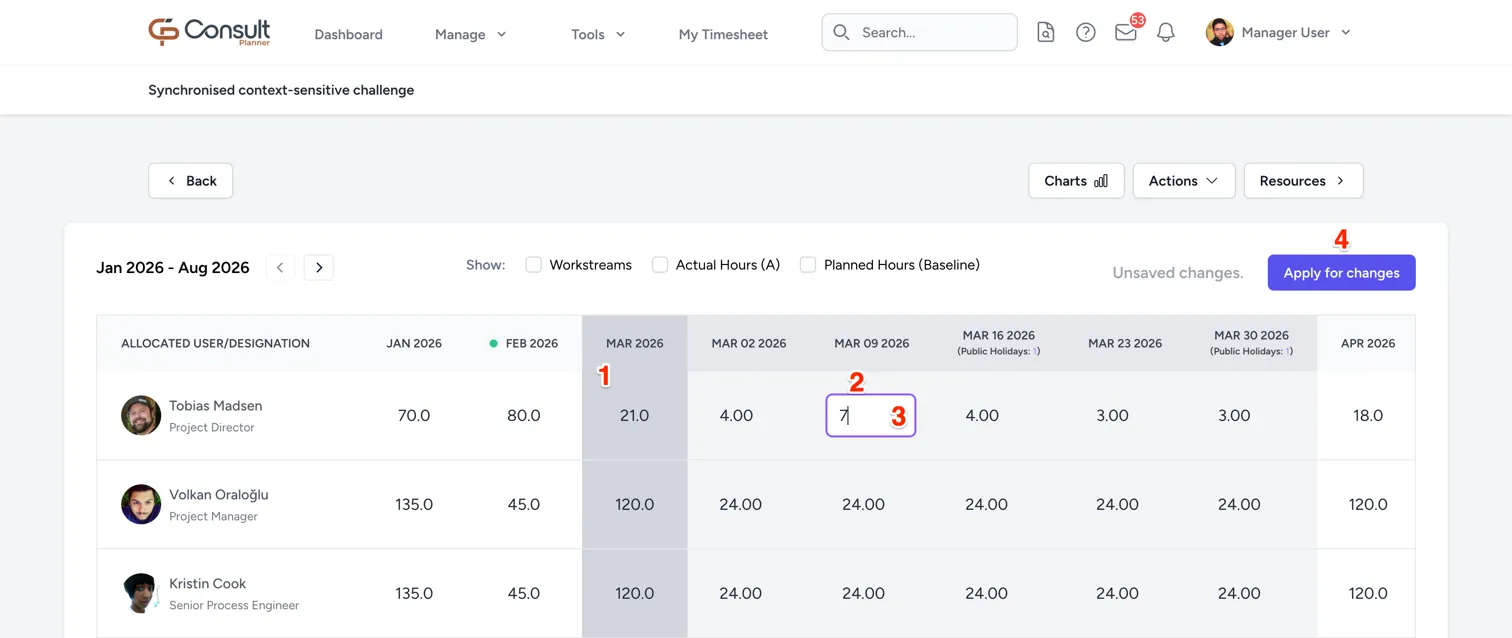
A cell is highlighted in red when the hours in it take the resource over their capacity for that week. The highlight is calculated when the page loads, so an existing over-allocation is visible before anything is edited.
Use the Show checkboxes above the grid to add reference rows beneath each resource:
- Actual Hours (A): The hours the resource captured on their timesheet.
- Available Hours (AV): The spare capacity the resource still has that week, across every project.
- The other hour type: Planned Hours (Baseline) while editing the forecast, and Forecast Hours while editing the baseline.
Editing a week that has already passed does not clear the resource’s approval or raise a new allocation request, since allocation approval only applies to future forecast hours.
The current week does not count as a past week, so it is still subject to the weekly cap and the approval workflow.
Understanding “To Plan”
The totals column on the project schedule shows a “To plan” figure for each resource, alongside their forecast, baseline, and actual hours. It is the baseline hours a resource still has left to work, with the baseline typically aligned to the purchase order, and is calculated as .
Read the result as follows:
- A positive figure (green) is the part of the baseline that has not been worked yet.
- A negative figure (red) means the resource has already worked more hours than the baseline allowed for.
To plan is always measured against the planned hours (baseline) and never against the forecast hours, so it does not move when the schedule is re-forecasted during the project. See hour types for the difference between the two. This also means a resource can be fully scheduled for the weeks ahead and still show a large positive figure, because little of the original commitment has been worked so far.
On WBS with Deliverable Scheduling projects, To plan is shown per resource per deliverable, using that deliverable’s own baseline and actual hours. On all other project formats it is a single total per resource.
Note: When a resource has no baseline hours, the schedule shows “To plan: No baseline hours” instead of a figure. This is expected, since there is no original commitment to measure against.
To plan is not the same as compliance to plan on the project overview page, which compares actual hours against forecast hours as a percentage.
Using Fill Hours
Use Fill Hours to assign hours to several resources across a set of weeks:
- Click Actions > Fill Hours.
- In the Fill weekly hours modal, complete the fields:
- Select Resources: The resources to populate. Leave blank to fill all.
- Select Months: The months to apply to. Leave blank to fill all current and future months.
- Enter Hours: How many hours should be worked per week.
- Click Fill hours to apply.
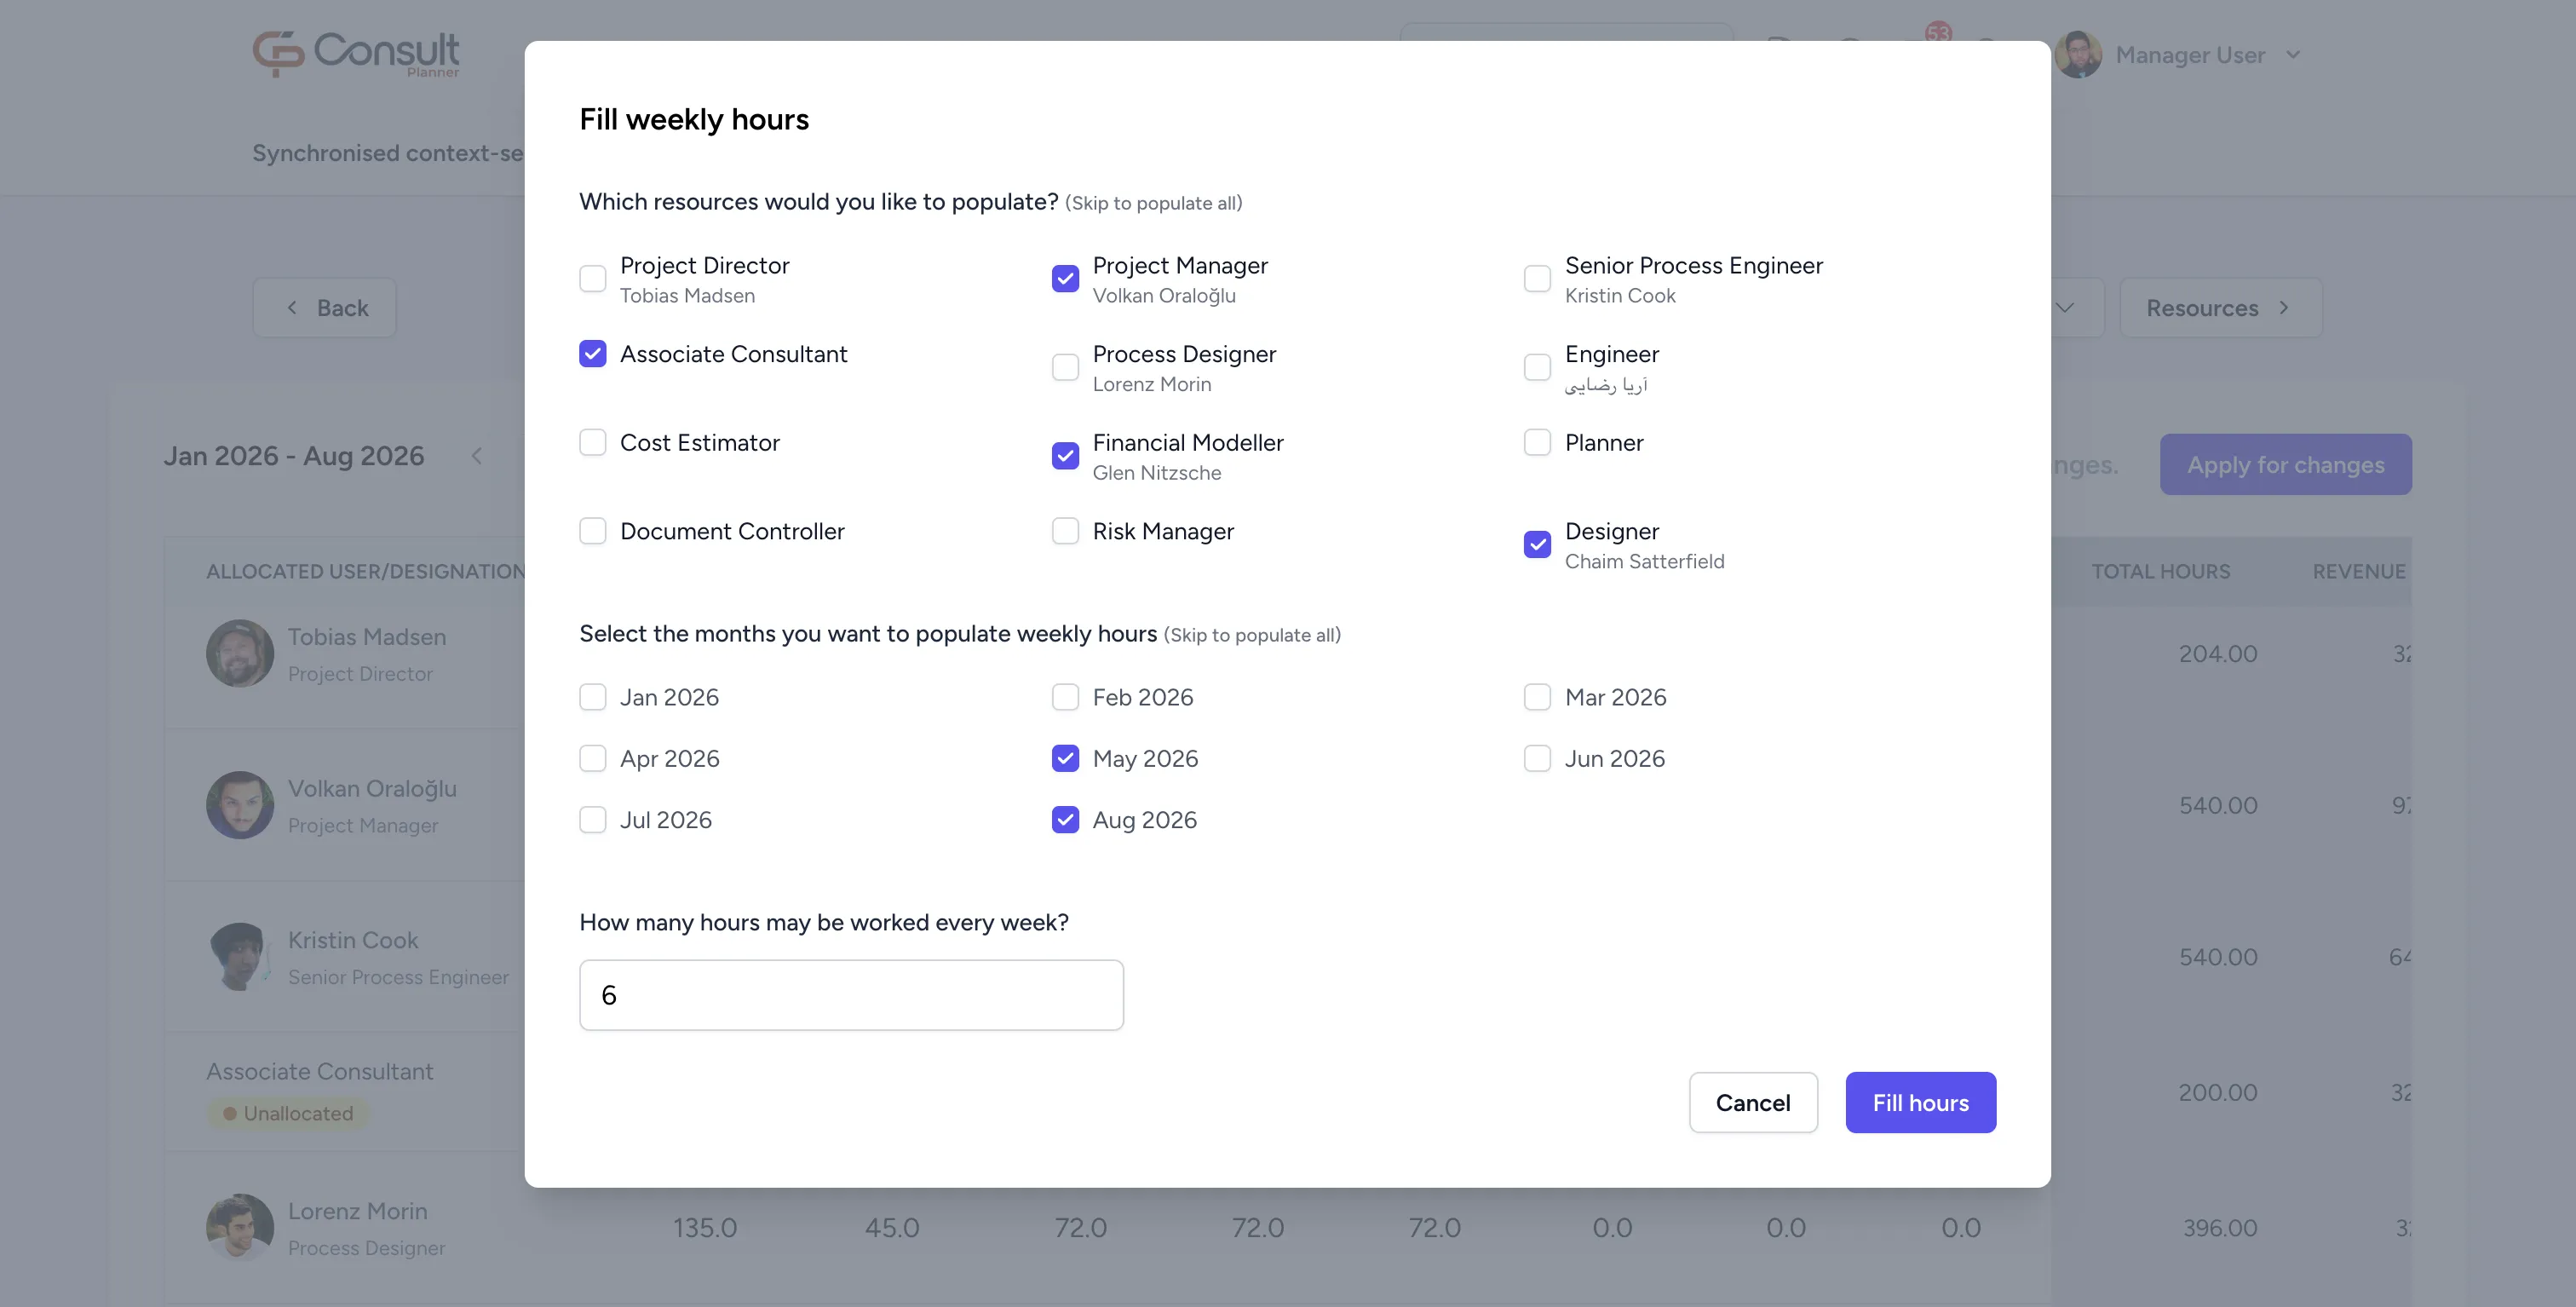
Warning: If any selected resource has hours pending approval, a warning appears. Confirm to override the pending approvals.
Align forecast to actuals
Align Forecast to Actuals rewrites the forecast hours of every past week to match what was actually worked, for every resource on the project at once.
To align the forecast:
- Click Actions > Align Forecast to Actuals.
- Click Align Forecast to Actuals to apply.
The current week is left alone, along with every week still to come, so the forward plan is untouched. Because only past weeks are rewritten, no resource is sent back for allocation approval and no schedule update emails are sent.
The original forecast for those weeks is not kept, so export the schedule first if the variance against the old forecast still matters.
Export the schedule
To export the schedule to a spreadsheet:
- Click Actions > Export Schedule.
- In the Export Schedule modal, choose the Granularity, either
WeeklyorMonthly. - Select the optional rows to include:
- Include Planned Hours (Baseline): Adds a baseline row per resource.
- Include Actual Hours: Adds a row of the hours captured on timesheets.
- Include Available Hours (AV): Adds a row of the resource’s spare capacity.
- Click Export.
The export is emailed to you when it is ready, rather than downloaded in the browser.
Available hours are the capacity a resource has left for a week: their maximum weekly hours, less everything already committed to them. That includes forecast hours on every project they are on, approved leave, and public holidays. Two points are worth knowing before reading the numbers:
- Past weeks are left out, since there is no spare capacity left to plan into.
- A fully booked resource exports
0rather than an empty cell.
Available hours can be included on every project format, at both weekly and monthly granularity.
Import hours
To import schedules from a file:
- Click Actions > Import Schedule.
- In the Import Schedule modal, complete the fields:
- Granularity: Choose
WeeklyorMonthly. - Override Actual Hours: When enabled, imported hours overwrite the actual hours captured on timesheets. It is only offered at weekly granularity.
- File: Select a
.csvor.xlsxfile.
- Granularity: Choose
- Click Import to apply.
Overriding actual hours works on every project format, including both WBS structures. It stays disabled until an administrator enables it, and the checkbox explains why: “This requires admin approval. Ensure your Consult administrator has enabled this in the admin settings.”. See configure admin settings for the setting itself.
Imported hours are spread in whole numbers wherever they divide that way, with any remainder pushed onto the trailing days or weeks rather than split across all of them. Overriding actual hours therefore captures 11 hours over 5 days as 2, 2, 2, 2, 3 rather than 2.2 each day, and a monthly import spreads the month’s total across its weeks the same way.
Warning: Importing overwrites the current schedules.
Assign resources to deliverables on WBS with Deliverable Scheduling projects
In WBS with Deliverable Scheduling projects, deliverables drive the structure. Each deliverable has its own forecast hours. You assign resources to a deliverable, then allocate hours to those resources within it. The schedule view is structured around deliverables first, then resources beneath them.
To create a WBS with Deliverable Scheduling deliverable:
- From the Schedule interface, click Deliverables in the top-right corner.
- Click + New Deliverable.
- In the Add Deliverable modal, complete the fields:
- Name: The name of the deliverable.
- Phase: The phase this deliverable belongs to.
- Start Date: The start date of the deliverable.
- End Date: The end date of the deliverable.
- Total Hours: The total hours for this deliverable.
- Code: A code to identify the deliverable.
- Order: The order of the deliverable within the phase.
- Click Create to save the deliverable.
To assign resources to a deliverable:
- Go to Schedule.
- Locate the relevant deliverable.
- Click Manage Resources.
- In the Resources modal, add resources by selecting them from the dropdown and clicking + Add Resource, or remove them from the table.
Assign deliverables to resources on WBS with Resource Scheduling projects
In WBS with Resource Scheduling projects, resources drive the structure. You assign deliverables to a resource, and each resource has a maximum allocation per deliverable. The schedule view is structured around resources first, then deliverables beneath them.
To create a WBS with Resource Scheduling deliverable:
- From the Schedule interface, click Deliverables in the top-right corner.
- Click + New Deliverable.
- In the Add Deliverable modal, complete the fields:
- Name: The name of the deliverable.
- Phase: The phase this deliverable belongs to.
- Start Date: The start date of the deliverable.
- End Date: The end date of the deliverable.
- Code: A code to identify the deliverable.
- Order: The order of the deliverable within the phase.
- Click Create to save the deliverable.
To assign deliverables to a resource:
- Go to Schedule.
- Locate the relevant resource.
- Click Manage Deliverables.
- In the Deliverables modal, add deliverables by selecting them from the dropdown and clicking + Add Deliverable, remove a deliverable from the table, or edit the maximum hours allocated to a deliverable.